Intro
PayPal has pretty much been the standard when it comes to doing any type of e-commerce transaction in a quick and easy format. Simply sign up for an account, set up your bank information, grab a button to put on your site and you’re in business.
However, to customize your PayPal screen is not exactly straightforward. I had to do this process the other day for this site, and I was so frustrated with how much time I spent looking around for the settings, that I decided to write this article to help you get it done quicker. In this quick article we’ll run through how to set up your own custom PayPal logo to give your PayPal transaction screen a more customized look and feel.
Overview
Step 1 – Create your Images
PayPal uses two images to customize your payment screens, a large header image (750×90) and a smaller image (190 x 60). Both images are needed and as PayPal continues to improve their interface your images may shift around a little bit. As of this writing most screen interactions only use the larger of the two. Below is an example of how the larger one appears.

Since the two image model is what PayPal has used for such a long time, you are pretty much guaranteed they will fit any current or new interface that PayPal generates. So once you’re done with the images they will always work unless you actually need to update your logo/brand image itself.
Please note that it’s important you create both images, otherwise you may end up haveing a brand in one section of PayPal and then the text of your account elsewhere in the PayPal site. This does not look professional and won’t give your business/site a professional flow, so just take the time and create both images and you’ll never have to worry about it again.
Here are images specifications:
- Larger Header = 750 pixels by 90 pixels in (jpg or gif)
- Smaller Logo = 190 pixels by 60 pixels in (jpg or gif)
- Subtract 5 pixels from the width and height to avoid any page cutoff.
- If you plan on hosting your own image on an SSL server, png will work.
Step 2 – Uploading your Image
PayPal doesn’t and probably never will host any of your brand images. Therefore, it is your responsibility to make sure the images are served up correctly. If you do plan on serving them up yourself you need to make sure the location that they are being served from is SSL (https). I tried serving them off a non-SSL server and it didn’t work for me.
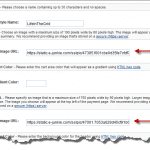
If you don’t have an SSL server, there is a free solution. Once you have your images completed, browse to SSLPIC.COM. This is a free service that provides SSL image hosting. Upload both of your images and then check your e-mail for the URL. You will need these later in step three.
Step 3 – Configure PayPal
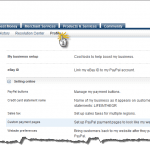
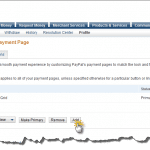
Click on the links in the following order to setup your brand (click images through for a larger view). Once you complete these steps in your branded PayPal page its ready to go and you won’t have to worry about anything unless you change your logo.
Wrap Up
In this article we set up your two primary PayPal logos used to brand your PayPal payment pages. While this scenario works great with many small businesses, you may need to give your users a more streamlined experience when you start to grow your business. This usually includes a workflow that allows your users to stay on your site through the whole entire shopping process.
PayPal has made the process of setting up and interacting with their services very easy. They offer two approaches to connect and interact with their system. The first is the Website Payments Standard and the second is the Website Payments Pro. The standard version is free and was covered above.

10 thoughts on “Customize Your PayPal Screen”
Comments are closed.


Cory,
Good article! It seems like I always have have to spend several hours messing around with the paypal interface every time I setup a new site. I’m bookmakring this article :)
BTW
What do you plan on doing if sslpic.com ever stops their free service?
Hey Hector,
The site sslpic.com I believe is owned by e-junkie.com they have been around for quite some time and provide the service as a benefit to their main customers. I’m pretty sure they will be around for quite some time. If not then I’ll just Google “free ssl host” or just set it up on my own host.
If your concerned about your link ever going down you can use a tool like Xenu’s Link Sleuth to validate your images. I use the tool on a weekly/monthly basis to check for any broken links on my site. There are several other free link valuator on the web that can help…
Cheers!
Great tips. Really useful and easy to follow.
Fantastic site. Plenty of useful information here. I am sending it to several pals ans also sharing in delicious. And obviously, thank you to your sweat!
Great article, many thanks for posting!
One question: Should the 2 sized pics be the same design but different size or should they be each of different design? I see where the bigger banner goes (on top) but I don’t see where the smaller one would go. Would they ever show up on the same page?
Thanks,
Rob
Hey Rob,
They can be different pics. The smaller one is used to be used on mobile sites, but your right I don’t really see it anymore. I think in most cases you could get by with just the large one…
Cheers~
Thanks Cory! Excellent tip on customizing the PayPal payment page. I really appreciate the help!
Hey Cory – Thanks so much for the great tip. My site needs all the help it can get and an upgraded PayPal page is a plus. I appreciate your efforts!
Glad to help out Bruce! Thanks for stopping by…
Hey,
This is an excellent tutorial. I’m so glad to see that there is a way to customize and configure PayPal with your business. I use that site to pay roth ira penalties to help keep my account secure!
Best,
Dennis